Techlicious editors independently review products. To help support our mission, we may earn affiliate commissions from links contained on this page.

Whether you like to watch videos with subtitles, are hard of hearing, or need them to keep the volume off out of courtesy to those around you, you’ll want to check out the new Live Captions feature of Windows 11. Live Captions, which recently rolled out with the big Windows 11 2022 Update (version 22H2), provides a real-time transcription of video you watch on your Windows 11 PC.
Like any transcription software, the accuracy of Live Captions is highly dependent on the quality of the audio. Produced videos with people speaking clearly have more accurate Live Captions than Zoom calls.
All audio processing is done locally on your computer. So, Zoom calls and other video chat applications that use your computer’s resources can also lead to captioning delays. Microsoft suggests that you turn off features like background blur and other more processing-intensive video effects if the captioning isn’t keeping up.
Here’s how to set up and use Live Captions for Windows 11.
1. Check to ensure you have installed Windows 11 Version 22H2. Go to Settings > System > About. In the Windows specifications section, you’ll see the version of Windows 11 that you’re running. If it doesn’t show 22H2, you’ll need to run Windows Update. If your computer doesn’t update to 22H2, you can download it here: https://www.microsoft.com/en-us/software-download/windows11.
2. Once Windows 11 Version 22H2 is installed, press Windows Key + Ctrl + L. You’ll be prompted to download the language files for your region.
3. Once downloaded, you can begin using Live Captions by pressing Windows Key + Ctrl + L.
Troubleshooting tip: For applications or video players that have their own volume control, like YouTube, make sure the volume is on. If you change the volume for the video player, Live Captions won’t work. However, you can change the system volume of your laptop, so you won’t hear audio through your laptop speakers or headphones.

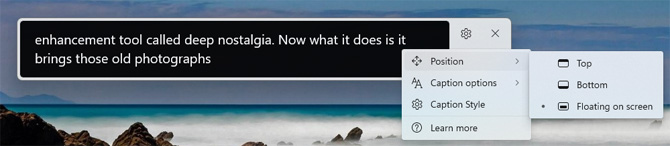
By default, the captions will be white text on a black background in a panel that sits at the top of your display. However, in the Live Captions settings (the cog in the upper right corner) you can choose to have the caption box at the bottom of the screen or float the panel so you can place wherever it fits best. You can also increase the font size, use all caps, and opt for yellow text on a blue background by selecting “Caption Style.”
For the captioning, there are two additional options to consider using. You can choose to have Live Captions include the audio from your microphone and opt out of showing profanity in your captions.
Live Captions doesn’t let you save the transcription of the videos you watch. However, it’s useful for casual viewing of videos when you can’t turn up the volume or are having trouble hearing someone on a video call.
[Image credit: Techlicious/Smartmockups]
For the past 20+ years, Techlicious founder Suzanne Kantra has been exploring and writing about the world’s most exciting and important science and technology issues. Prior to Techlicious, Suzanne was the Technology Editor for Martha Stewart Living Omnimedia and the Senior Technology Editor for Popular Science. Suzanne has been featured on CNN, CBS, and NBC.
.