Finding a laptop serial number isn’t always as straight forward as it may sound, depending on the make and model of your device. However, you might need this meaningless-looking jumble of letters and numbers for service, upgrade or warranty purposes. Thankfully, there are a few different ways to crack this nut.
Our guide uses the built-in Windows command line to unearth the laptop serial number. It must be noted that if your laptop is having serious issues which are stopping you turning it on, or it is otherwise unusable, then this method won’t work for you.
If you can’t open the Windows command line, you should instead look for physical evidence of the laptop serial number. On our Dell XPS 15, for example, there is a magnetic flap on the underside of the laptop which you can flip open to see lots of trademarks, regulatory logos, serial numbers, codes, and other information. Dell has printed a ‘Service Tag’ here, and that is Dell’s parlance for the device’s serial number. We’ve partially obscured this machine’s serial number.
If the serial number of your laptop isn’t printed somewhere on the laptop body, like the underside, it might be inside on a label somewhere. Other places you could find it physically printed are; on the laptop packaging, on your purchase receipt, or on any warranty/registration forms you have. If you sent off warranty forms, you might have gotten something back by mail or email.
Finally, before we dive into the command line, your laptop might come with systems utilities and updaters from whatever vendor made it. Again, on this Dell XPS laptop, there is a system utility called ‘Dell Update’ which displays the ‘Service Tag’ = serial number on its home screen. In some ways, it is peculiar that Microsoft doesn’t fold this information into the ‘About your PC’ settings page.
Hardware used
- A laptop running Windows 10
Short version
- Open the Windows Command line
- Type ‘wmic bios get serialnumber’ (without the quotes) at the prompt
- Your laptop serial number is displayed
-
Step
1Open the command line
We need to access the Windows Command Prompt, so hold the Windows key and hit R. This key combination summons the Windows Run Box. With this text input box now open, type ‘cmd’ without the quotes and hit Enter or Return.
-
Step
2Type in the query command

Now you have the Command window open and active, you need to type or copy and paste the following, without the quotes: ‘wmic bios get serialnumber’. If you make any spelling mistakes, or put spaces in the wrong place, it won’t work, but you can try again without any worry.
-
Step
3Your serial number is displayed on the screen
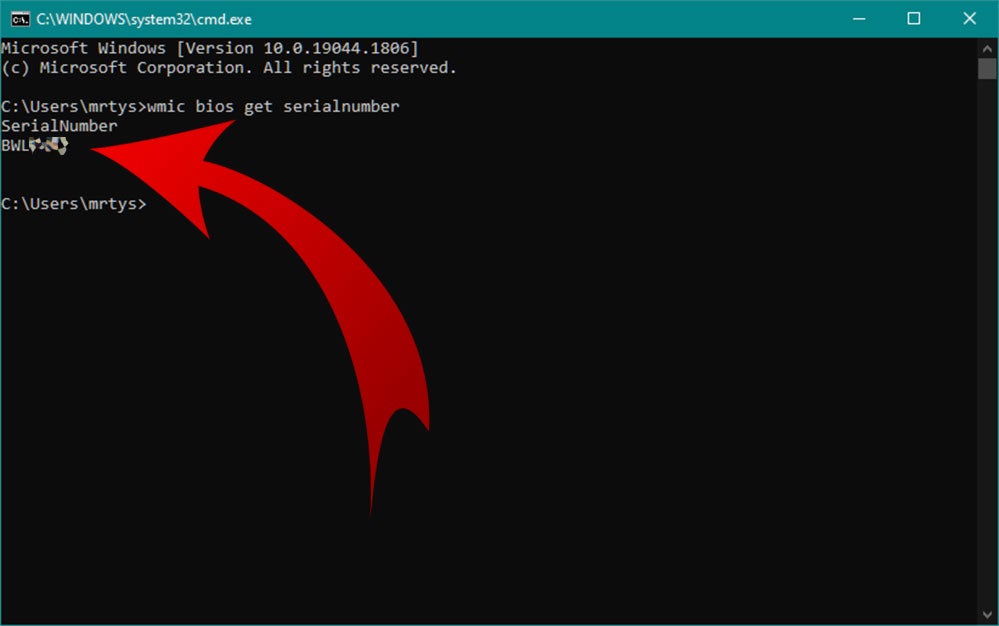
After inputting the command above, hit enter, and you will see an output appear. Underneath the output SerialNumber, the command will have revealed your laptop’s serial number, which in our case is the same as the Service Tag. If you previously checked packaging or receipts for the serial number, this command should have confirmed that the device in the box has not been switched before you received it.
FAQs
As we mentioned in the intro, your device serial number may be printed in the following places; the underside of the laptop, inside the laptop, on the laptop box, on a warranty card, or on a purchase receipt.
We made use of a command called WMIC, an abbreviation of ‘Windows Management Instrumentation Command-line’. WMIC can deliver several chunks of info from your BIOS, and other things, but we only wanted to query it regarding the laptop serial number today.