External flash drives can be very small.
AppleInsider may earn an affiliate commission on purchases made through links on our site.
If you have to use a flash drive on both Macs and Windows PCs, make sure both systems can read it. Here’s how to format the drive correctly.
While there is a lot of interoperability between Apple’s Mac ecosystem and Windows computers, not everything is completely rosy. One of these areas is data sharing.
Sure, you could rely on a network connection and devices like a NAS or a fileserver to handle data storage between the two sides, but it’s not necessarily an option for everyone.
In some cases, you’ll have to rely on flash drives or external hard drives, and physically moving and connecting the storage to each device. This can be true in situations where there’s a lot of data in use, such as video editing, where it can be a lot quicker to go down this route than to work over a network.
Although it seems simple, there are still some things you need to know before going down this route.
File Systems
While hardware concerns are going to be fairly easy to work out, such as what physical connections are available and a budget for drives, there’s another element that can trip people up.
The file systems natively used by Windows and macOS are wildly different, with security and other elements getting in the way of being able to use them both on the same computer.
For example, if you format a drive to NTFS, the file system favored by Windows, your Mac will be able to read the drive but won’t write to it directly. Likewise, an APFS drive will be readable by a Mac, but on Windows, you need some further software assistance to work with it.
The answer to the problem is to use exFAT, a file system designed to replace the old FAT32 file system. As well as going far beyond FAT32’s 4TB maximum file size and 8TB partition size limits, exFAT is also optimized for flash drives, which includes thumb drives and external storage devices.
Formatting a drive in macOS is easy, and is all done via Disk Utility.
Handily, both Windows and macOS play nice with exFAT, with each reading from and writing to partitions using the file system.
As a general rule, if the flash drive you are using is 32GB in capacity or lower, you should set it to be MS-DOS(FAT), and save exFAT for drives above 32GB in capacity. However, as we’re seeing fewer sub-32GB thumb drives in regular use, it’s not a bad thing to stick to using exFAT in such cases.
Formatting
You can use either macOS or Windows to format the drive into exFAT, as it’s equally usable by both platforms, regardless of which formatted it in the first place. What follows are instructions for formatting the drive on both platforms.
How to format a flash drive in macOS to use on Windows
- Plug the drive into an appropriate port on the Mac, or a connected dock’s ports. It will usually appear as a drive on the desktop.
- Open Disk Utilitywhich can be found via the Launchpad or by using Spotlight with Command-Space followed by searching for the term “Disk Utility.”
- In the left-hand sidebar, select the disk you’ve just attached to the Mac.
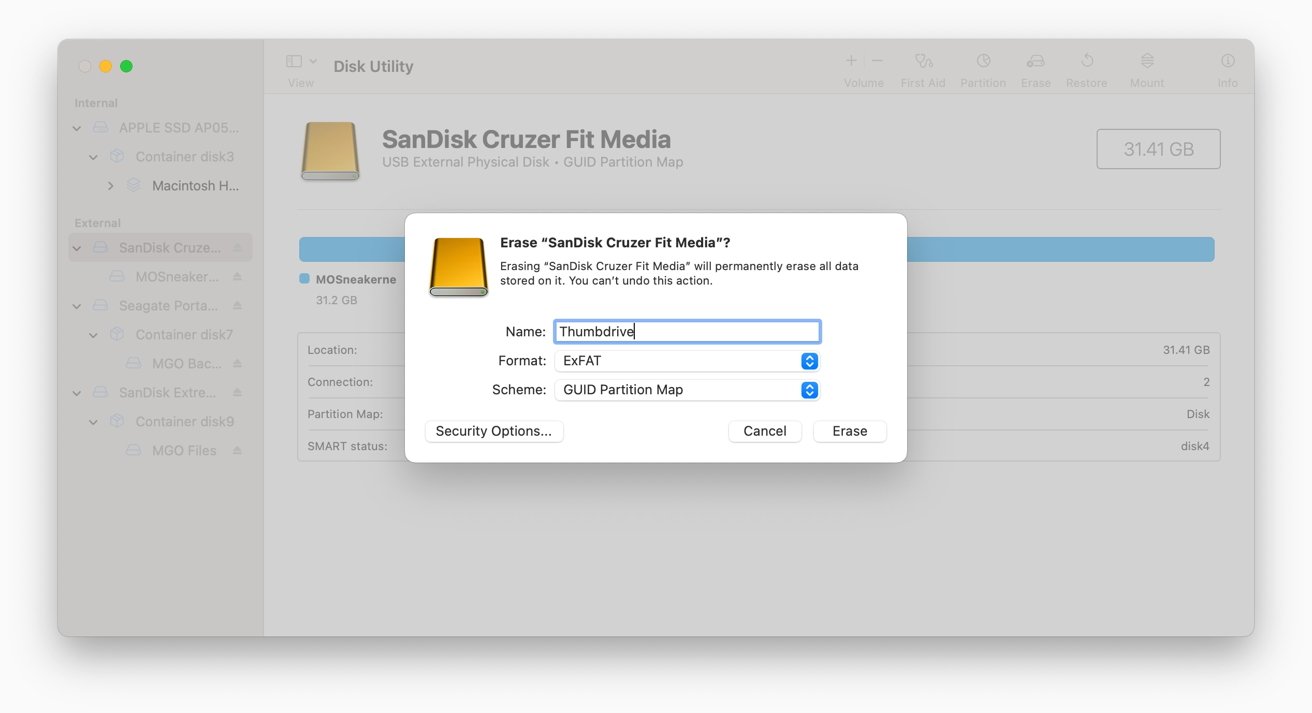
- Click Erase in the toolbar.
- In the Erase dialog box, enter a meaningful namely for the drive, then select ExFAT under the Format dropdown.
- If the dialog box has a Scheme option, set it to Master Boot Record.
- Click Erase. Once complete, click Give.
For the Scheme option, Apple recommends using the Master Boot Record to ensure the drive is compatible with all Windows PCs. You could also use GUID Partition Map, but Apple warns that it is usable by “some newer” PCs, and therefore may not work for older PC setups.
You should typically use Master Boot Record as the most compatible option for Windows desktops. You can get away with GUID Partition Map, but there’s that small chance of incompatibility.
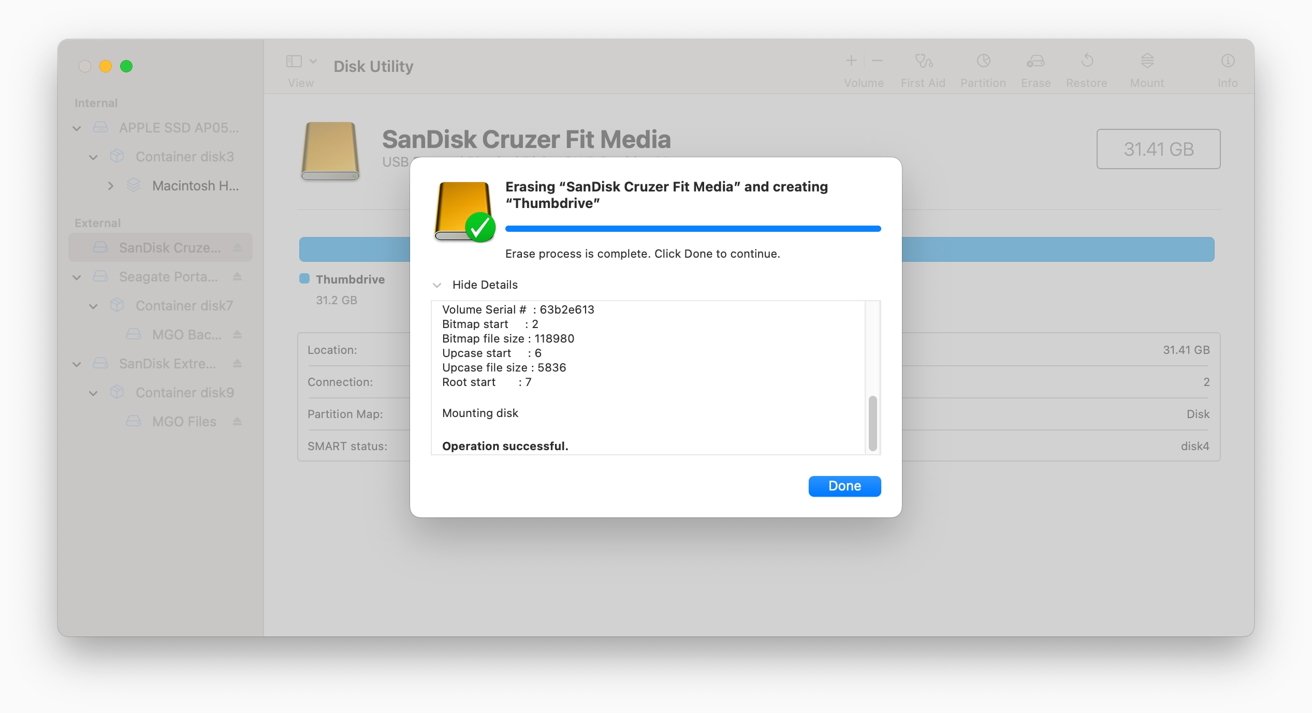
What you’ll see once you finish a disk format in macOS
At this point, you should unmount the drive as usual, then plug it into your Windows PC to check it functions as intended.
How to format a flash drive in Windows for macOS
- Plug the drive into the PC.
- Open File Explorerand select This PC in the sidebar.
- Select then right-click on the drive, and click Format.
- In the Format window, select exFAT for the file system.
- The Allocation unit size refers to the chunks of capacity a file can use, with smaller sizes more appropriate for large numbers of tiny files. If in doubt, this can be safely left at default settings.
- Enter a namely for the drive under Volume Label.
- If the drive contained sensitive information, uncheck it Quick Formatotherwise keep it enabled.
- Click Startthen on the Warning dialog box, click ok.
- Once the format has completed, click ok.
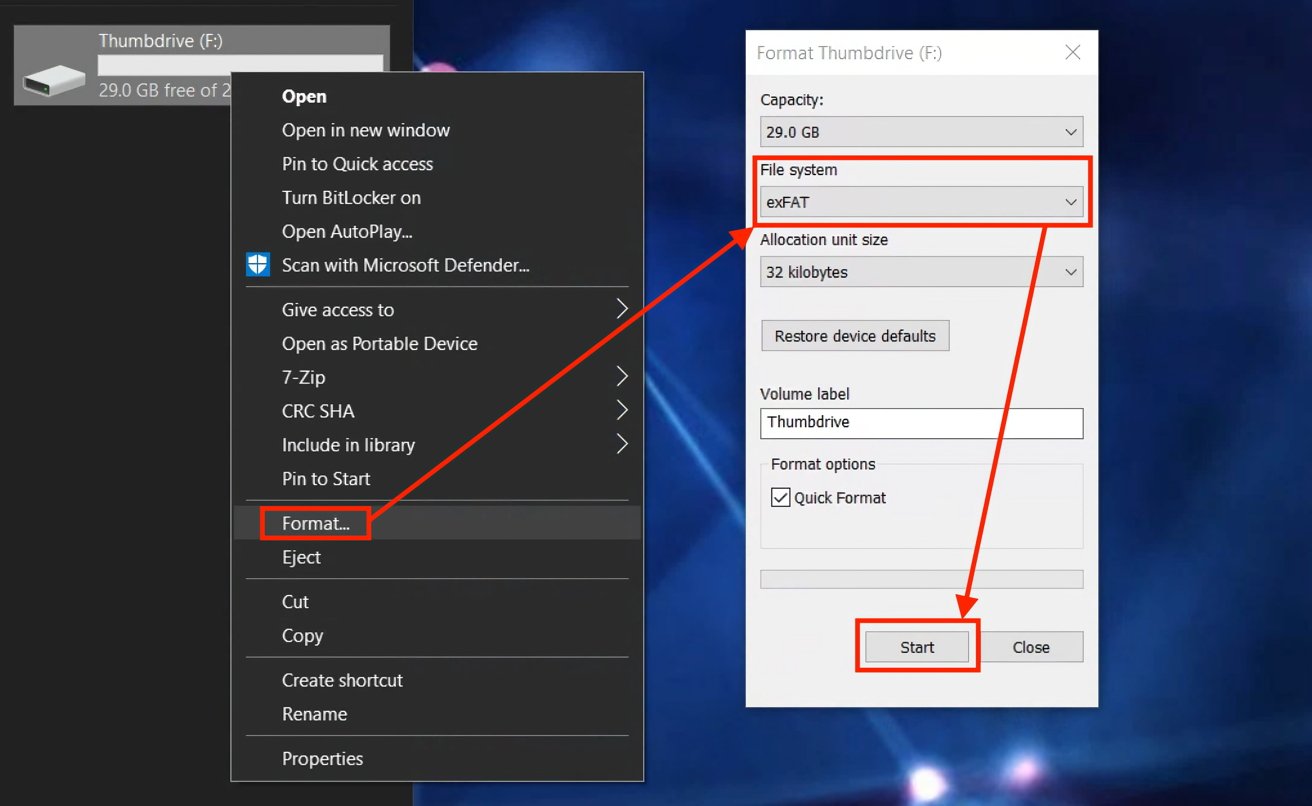
Formatting a drive in Windows.
Again, you can unmount the drive and put it on a Mac to confirm it works as expected.
You really should use cloud storage or a NAS if you can
While you could perform file transfers or have a shared data pool using flash drives or other external drives, it’s not really the best approach for most users.
Strongly consider acquiring a NAS for your network, especially if there is more than one person that needs to access the same data at the same time. Using a NAS, multiple users can access that data, without needing to ask one another for physical possession of the drive itself.
Then there’s the ability to have multiple large drives at your disposal, providing higher capacities and redundancy depending on the configuration.
And, for more modest needs, cloud storage works too.
A flash drive is useful for data transfers when you’re in a pinch or there’s a sense of urgency when there’s no other option available. A network-based approach is a far better plan to adopt.
.